# Tutorial: How to Publish Your First Docker Image to Docker Hub
## Tutorial: How to Publish Your First Private Docker Image
### Overview
Publishing an image to a **container registry** makes it portable, shareable, and easy to deploy. The Verda platform supports various registries, including [Docker Hub](https://hub.docker.com/repositories), [GitHub Container Registry](https://github.com/container-registry) (GHCR), [Google Artifact Registry](https://docs.cloud.google.com/artifact-registry/docs) (GCP), and [Amazon Elastic Container Registry ](https://aws.amazon.com/ecr/)(ECR). You can find more details in our [**Container Registries documentation**.](https://docs.datacrunch.io/~/revisions/b1xUgPLYsvwiZGX4hF1g/containers/container-registries)
This tutorial will focus on Docker Hub as an example. We will guide you through creating a `Dockerfile` for an Ollama-based LLM server, building it, and securely publishing it as a private image to a Docker Hub repository using an Access Token.
### Prerequisites
Before you begin, ensure you have the following:
1. **Docker Installed:** Docker Engine or Docker Desktop must be installed and running on your local machine. You can download it from the [official Docker website](https://www.docker.com/products/docker-desktop/).
2. **A Docker Hub Account:** You will need a free account, which includes one free private repository. If you don't have one, you can sign up at [Docker Hub](https://hub.docker.com/).
### Step 1: Prepare the Application
We will create a project directory and a `Dockerfile` that defines a self-contained, configurable Ollama server.
**1. Create a Project Directory**
Open your terminal and create a new directory for your project.
```bash
mkdir my-private-ollama-server
cd my-private-ollama-server
```
**2. Create the Dockerfile**
Inside the directory, create a new file named Dockerfile.
```code
touch Dockerfile
```
Open the Dockerfile in an editor e.g. using `nano Dockerfile` and copy the following contents into it.
{% hint style="warning" %}
**Note:** The `FROM` instruction above uses a specific Ollama version (`0.12.6`). We recommend checking the [official Ollama Docker Hub page](https://hub.docker.com/r/ollama/ollama/tags) for the latest available versions and updating your `Dockerfile` as needed.
{% endhint %}
```dockerfile
FROM ollama/ollama:0.12.6
# Install curl for health checks and jq for JSON processing
RUN apt-get update && \
apt-get install -y curl jq && \
rm -rf /var/lib/apt/lists/*
# Create a robust startup script inside the image
RUN cat > /start-ollama.sh <<'EOF'
#!/bin/bash
set -e
echo "=== Ollama Container Starting ==="
echo "Model storage path: ${OLLAMA_MODELS:-/data/.ollama/models}"
echo "Host binding: ${OLLAMA_HOST:-0.0.0.0:8000}"
# Set default values for model storage and host
export OLLAMA_MODELS=${OLLAMA_MODELS:-/data/.ollama/models}
export OLLAMA_HOST=${OLLAMA_HOST:-0.0.0.0:8000}
echo "Creating models directory: ${OLLAMA_MODELS}"
mkdir -p "${OLLAMA_MODELS}"
# Start Ollama server in the background
OLLAMA_PORT=${OLLAMA_HOST##*:}
echo "Starting Ollama server on port ${OLLAMA_PORT}..."
ollama serve &
OLLAMA_PID=$!
# Wait for the Ollama API to become available
echo "Waiting for Ollama API to be ready..."
TIMEOUT=600
ELAPSED=0
while ! curl -s http://localhost:${OLLAMA_PORT}/api/tags >/dev/null 2>&1; do
if [ $ELAPSED -ge $TIMEOUT ]; then
echo "ERROR: Ollama failed to start within $TIMEOUT seconds"
kill $OLLAMA_PID 2>/dev/null
exit 1
fi
sleep 1
ELAPSED=$((ELAPSED + 1))
done
echo "✓ Ollama API is ready!"
# If a model is specified in the environment variable, download it
if [ -n "$OLLAMA_PULL_MODEL" ]; then
echo "Model requested: $OLLAMA_PULL_MODEL"
if ollama list | grep -q "^${OLLAMA_PULL_MODEL}"; then
echo "✓ Model $OLLAMA_PULL_MODEL already exists."
else
echo "→ Downloading model: $OLLAMA_PULL_MODEL. This may take a while..."
if ollama pull "$OLLAMA_PULL_MODEL"; then
echo "✓ Model download successful!"
else
echo "ERROR: Failed to download model."
fi
fi
fi
# Trap signals for graceful shutdown
trap "echo 'Shutting down...'; kill $OLLAMA_PID; exit 0" SIGTERM SIGINT
echo "=== Ollama server is running on ${OLLAMA_HOST} ==="
wait $OLLAMA_PID
EOF
# Make the startup script executable
RUN chmod +x /start-ollama.sh
# Set default environment variables. These can be overridden at runtime.
ENV OLLAMA_MODELS=/data/.ollama/models
ENV OLLAMA_HOST=0.0.0.0:8000
ENV OLLAMA_PULL_MODEL=llama3:8b
# Add a healthcheck to let Docker know when the container is ready
HEALTHCHECK --interval=30s --timeout=10s --start-period=60s --retries=3 \
CMD curl -f http://localhost:8000/api/tags || exit 1
LABEL maintainer="support@datacrunch.io" \
version="1.0" \
description="Ollama with automatic model download support"
# Expose the default port
EXPOSE 8000
# Set the entrypoint to our startup script
ENTRYPOINT ["/start-ollama.sh"]
```
Save and close the file.
### Step 2: Build the Docker Image
With the `Dockerfile` in place, you can build the image. This command builds from the current directory (`.`) and gives it a memorable local name (`-t my-ollama-server`).
```bash
docker build -t my-ollama-server .
```
After the build completes, verify that the image was created:
```bash
docker images
```
You should see `my-ollama-server` in the list.
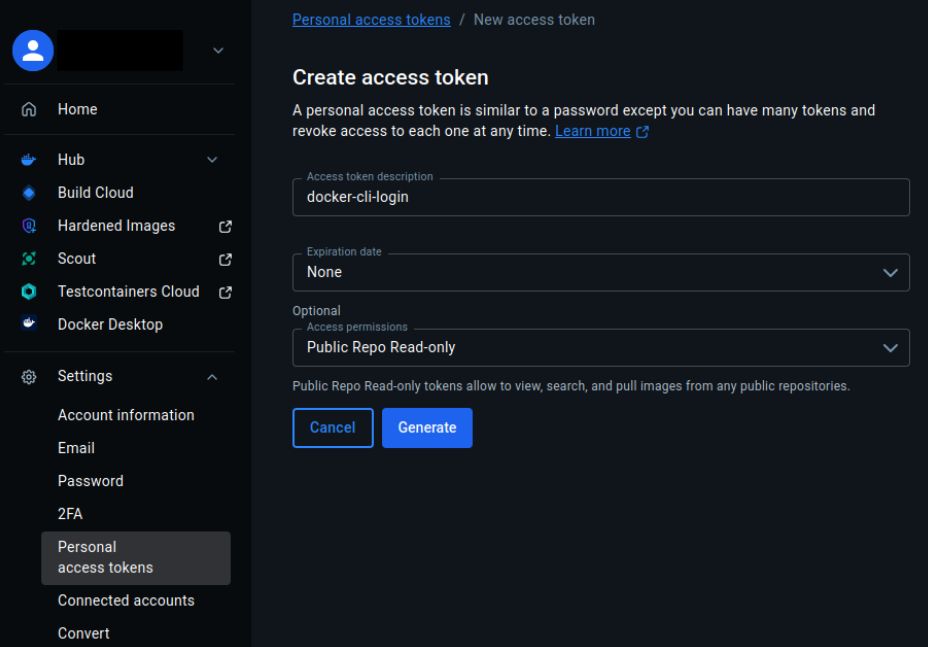
### Step 3: Create a Docker Hub Access Token
For security reasons, especially in automated environments, it is a best practice to use an **Access Token** instead of your password to log in.
1. Log in to your Docker Hub account in your web browser.
2. Click on your profile icon in the top-right corner and select `Account Settings`.
3. Navigate to the Settings tab and Personal Access Token and then click `Generate Token`.
4. Give your token a descriptive name (e.g., `cli-login-token`).
5. Set its expiry date to `none` and permissions to `Read, Write, Delete`.
6. Click Generate.
**Important: Docker Hub will only show you the token once. Copy it immediately and save it in a secure location, like a password manager.**
### Step 4: Log in to Docker Hub via Terminal
Now, authenticate your Docker CLI using your username and the Access Token you just created.
```bash
docker login -u
```
Replace with your actual username
At the `password` prompt, enter the `personal access token`.
A `Login Succeeded` message will confirm you are authenticated.
### Step 5: Create a Private Repository on Docker Hub
Before you can push your image, you need to create a private repository to house it.
1. On the Docker Hub website, navigate to Repositories.
2. Click `Create Repository`.
3. Repository Name: Enter a name. This must match the name you will use in the next step (e.g., `ollama-server`).
4. Visibility: Select `Private`.
5. Click Create.
### Step 6: Tag the Image for Docker Hub
A Docker Hub image requires a specific naming convention: `/:`
{% hint style="danger" %}
**Warning:** For production stability and predictable deployments, always use a specific, immutable version tag (e.g., `:1.0`, `:1.0.1`). Avoid using the mutable `:latest` tag, as it can be overwritten and lead to unexpected behavior when deploying new versions.
{% endhint %}
You need to tag your local `my-ollama-server` image so that it matches the private repository you just created. **Replace** `your-username` with your actual Docker Hub username.
```bash
docker tag my-ollama-server your-username/ollama-server:1.0
```
Run `docker images` again. You will now see two entries for the same image ID, showing that your local image is ready to be pushed.
### Step 7: Push the Image to Your Private Repository
Now you are ready to publish your image. Use the `docker push` command with the full name you just created.
**Remember to replace `your-username` with your Docker Hub username.**
```bash
docker push your-username/ollama-server:1.0
```
Docker will upload the image layers to your private Docker Hub repository.
### Verification and Usage
**1. Check Docker Hub**
Refresh your repositories page on the Docker Hub website. You will see your ollama-server repository, now with a PRIVATE label and the new 1.0 tag.
**2. Use the Published Private Image**
To run your private image on any machine (including a new server or a colleague's computer), that machine must first be authenticated to your Docker Hub account.
```bash
docker run --rm --gpus all your-username/ollama-server:1.0
```
Docker will automatically pull the image from Docker Hub if it's not found locally and then run it.
**Congratulations, you have successfully built, tagged, and published your first Docker image!**\
Source: [Docker Docs](https://docs.docker.com/get-started/docker-concepts/building-images/build-tag-and-publish-an-image/)
### Next Steps
Now that you have learned how to publish a Docker image, you are ready to deploy it on a scalable platform. You can use the skills from this guide to publish an image and then deploy it by following our [T**utorial: Deploying GPT-OSS 120B with Ollama**](https://docs.datacrunch.io/containers/tutorials/quick-deploying-gpt-oss-120b-ollama-on-serverless-containers)