Confidential Computing
Info
Verda now offers Confidential Computing on RTX PRO 6000, B200, and B300 GPUs and on AMD CPU-only instances. If you need more capacity, reach out to us.
Confidential Computing (CC) protects data in use, while it is actively being processed in memory, not just at rest on disk or in transit over the network. Verda Confidential VMs (CVMs) run inside a hardware-enforced Trusted Execution Environment (TEE) that encrypts both CPU and GPU memory and cryptographically isolates your workload from the hypervisor and the cloud provider. Even Verda's own infrastructure cannot read plaintext data inside a running CVM.
Confidential Computing instances cannot reboot from inside the guest
A running CVM has no firmware/bootloader to re-measure it, so an in-guest reboot (or shutdown -r) will not bring the instance back up. To restart a CVM, use the Verda console (or API): Shutdown, then Start. Each boot is freshly measured and attestable.
How it works
- AMD SEV-SNP (CPU): each CVM gets a unique AES-128 memory encryption key managed exclusively by the AMD Secure Processor (AMD-SP), an on-chip security co-processor the hypervisor cannot access. SEV-SNP adds memory integrity protection via the Reverse Map Table (RMP), which prevents the hypervisor from replaying, remapping, or corrupting guest memory pages. CPU register state is additionally encrypted on every hypervisor exit (SEV-ES).
- NVIDIA Confidential Computing (GPU): the Blackwell GPUs listed in Supported Hardware run in CC mode with all ingress and egress paths protected by AES-256-GCM encryption. GPU memory is isolated from the host. NVIDIA firmware verifies its own integrity at boot via an on-die hardware Root of Trust before the GPU accepts any workload.
- Encrypted PCIe transfers: data moving between the CVM and the GPU passes through bounce buffers. Payloads are AES-GCM-encrypted inside the CVM, staged through a shared PCIe buffer, and decrypted only once inside GPU-protected memory. A rolling 96-bit IV and an AES-GCM AuthTag prevent replay and tampering on the bus.
- Trust boundary: the TEE perimeter encloses the CVM and the GPU's protected memory. The KVM/QEMU hypervisor, host OS, cloud management software, and all other VMs sit outside this boundary and are treated as untrusted.
- Measured boot (direct kernel boot): Verda launches each CVM with QEMU direct kernel boot (
-kernel/-initrd/-append) and SEV-SNP kernel hashes enabled, so a SHA-384 digest of the OVMF firmware, kernel, initramfs, and kernel command line is folded into the SEV-SNP launch measurement. The attestation report therefore covers your exact boot chain: not only that the hardware is genuine, but that the firmware, kernel and initrd that booted are the ones you expect. You can recompute and verify this yourself, including the exact firmware (a Verda-built AmdSev OVMF version, see OVMF). - Attestation: before any workload runs, you can cryptographically verify the full stack. CPU and GPU attestation are independent: the AMD-SP issues a signed SEV-SNP report (VCEK-signed ECDSA, tied to the firmware TCB version and the launch measurement above) verifiable against AMD's certificate chain, while
nvattestperforms GPU-only remote attestation, proving the GPU is genuine, firmware is unmodified, and CC mode is active.
Architecture
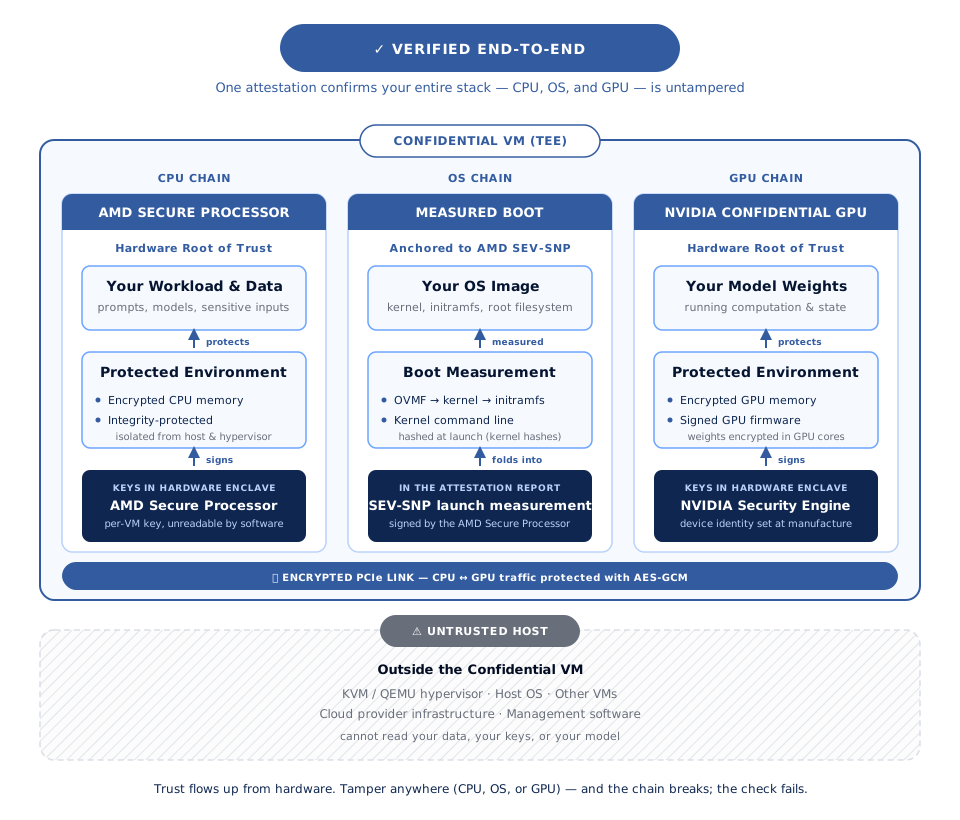
The AMD-SP hardware and the CVM (including its assigned GPU) are the only trusted components. The hypervisor can schedule and terminate the VM but cannot read its memory or register state. Verda's management plane is outside the trust boundary and has no access to plaintext data or decryption keys.
Attestation chain
Before a workload runs, the full hardware stack can be verified by a remote party. CPU and GPU attestation are separate flows. See System Attestation for the exact commands to run on your instance.
- CPU attestation (AMD SEV-SNP): the AMD-SP generates a report containing the launch measurement (a SHA-384 over the OVMF firmware plus, because Verda uses direct kernel boot, the kernel, initramfs and kernel command line), the SEV-SNP TCB version, and a user-supplied nonce or public key hash. The report is signed with the VCEK (a per-chip ECDSA key cryptographically derived from the firmware version), verifiable against AMD's public certificate chain. This is handled independently via the SEV guest driver (
/dev/sev-guest). - GPU attestation (NVIDIA):
nvattest attest --device gpu --verifier remotedrives a GPU-only attestation flow. The NVIDIA driver establishes an SPDM session with GPU firmware using a Diffie-Hellman key exchange, and GPU firmware returns a certificate and measurement report signed by NVIDIA's Root of Trust, proving the GPU is genuine and running unmodified firmware in CC mode. On success,nvattestautomatically sets the GPU Ready State, which gates CUDA workload execution.
Supported Hardware
Verda currently supports confidential computing on the following hardware:
| Hardware | Size | AMD SEV-SNP | Intel TDX |
|---|---|---|---|
| NVIDIA RTX PRO 6000 | Single GPU | Available | — |
| NVIDIA B200 | Multi GPU | Available | Coming soon |
| NVIDIA B300 | Multi GPU | Available | Coming soon |
| CPU-only | up to 360x | Available | — |
System Attestation
Attestation lets you verify that your instance is running with full confidential computing protections enabled.
Verify CPU RAM encryption
$ sudo dmesg | grep -i sev-snp
[    1.816039] Memory Encryption Features active: AMD SEV SEV-ES SEV-SNP
Run AMD SEV-SNP CPU attestation
Install snpguest (one-time):
$ curl -fsSL https://github.com/virtee/snpguest/releases/download/v0.10.0/snpguest \
    -o /usr/local/bin/snpguest && chmod +x /usr/local/bin/snpguest
Check that SEV, SEV-ES, and SNP are all active:
Generate an attestation report and fetch the AMD certificate chain:
$ mkdir -p /tmp/snp-attest
$ snpguest report /tmp/snp-attest/report.bin /tmp/snp-attest/nonce.bin --random
$ snpguest fetch ca pem /tmp/snp-attest/ turin
$ snpguest fetch vcek pem /tmp/snp-attest/ /tmp/snp-attest/report.bin
Verify the certificate chain (AMD ARK → ASK → VCEK):
$ snpguest verify certs /tmp/snp-attest/
The AMD ARK was self-signed!
The AMD ASK was signed by the AMD ARK!
The VCEK was signed by the AMD ASK!
Verify the attestation report is signed by this chip's VCEK:
$ snpguest verify attestation /tmp/snp-attest/ /tmp/snp-attest/report.bin
Reported TCB Boot Loader from certificate matches the attestation report.
Reported TCB TEE from certificate matches the attestation report.
Reported TCB SNP from certificate matches the attestation report.
Reported TCB Microcode from certificate matches the attestation report.
VEK signed the Attestation Report!
Verify measured boot
Because Verda boots your CVM with direct kernel boot and SEV-SNP kernel hashes, the launch measurement in the SEV-SNP report equals a SHA-384 over the OVMF firmware, the kernel, the initramfs, and the kernel command line. You can verify it end-to-end: fetch the signed report, independently recompute the expected measurement from the on-disk boot artifacts, and compare.
Download and run the helper inside the CVM, as root:
$ chmod +x measure_boot.sh
$ sudo ./measure_boot.sh
[+] Fetching SEV-SNP attestation report...
[+] Computing expected measurement with sev-snp-measure...

OVMF     : /boot/OVMF.amdsev.fd
Kernel   : /boot/vmlinuz
Initrd   : /boot/initrd.img
Cmdline  : console=ttyS0 root=UUID=... ro ...
vCPUs    : 30 (family=26 model=2 stepping=1)

Report measurement   : 5D8F582C2D1FF3311E6B2E25509F130343B012EC5EFE06756E01E5FB4FE44DF4...
Expected measurement : 5D8F582C2D1FF3311E6B2E25509F130343B012EC5EFE06756E01E5FB4FE44DF4...

MATCH: launch measurement matches OVMF+kernel+initrd+cmdline
A MATCH means the running CVM was launched from exactly that firmware, kernel, initramfs and command line: the hardware and the boot chain are verified. The script auto-installs its dependencies (snpguest, and sev-snp-measure via pipx), so the instance needs outbound internet and apt the first time.
Note
Everything the measurement is computed over is available inside the CVM, so the script runs with no extra setup: the firmware is bundled to /boot/OVMF.amdsev.fd at provisioning time (see OVMF), and /boot/vmlinuz + /boot/initrd.img are the kernel and initramfs of your own volume (see vmlinuz and initrd). To pin a known-good value, record the Expected measurement from a trusted build and compare future reports against it (the report's measurement is what the AMD-SP signs).
OVMF
OVMF (Open Virtual Machine Firmware) is the UEFI firmware of the VM, the very first code that runs when your CVM starts. It initializes the virtual hardware and loads the kernel via direct kernel boot. Because SEV-SNP measures the boot chain from the very first instruction, the firmware blob is the first thing folded into the launch measurement.
You cannot bring your own OVMF: the firmware is loaded and measured by the host at launch, so Verda builds and pins one firmware for the entire CC fleet. That keeps the launch measurement reproducible, and every CC instance on every platform boots the same, publicly auditable blob:
| Source | verda-cloud/edk2, branch amdsev-large-bars |
| Release | verda-amdsev-largebars-stable202605 |
| Commit | 0c0bd94a4699bde01f86c6b9c39f37545af68a4a |
| SHA-256 | fea1855b6c983324246e6d3fb6642be200c0a38fd17b94884a45130ffb0b3a81 |
The build enables 1 GiB page tables (PcdUse1GPageTable=TRUE): Ubuntu's stock OVMF.amdsev.fd hangs early in boot once the 64-bit PCI MMIO aperture exceeds 512 GiB, so every CVM instead launches behind a fixed 16 TiB aperture with this version.
To rebuild the firmware from source, follow the build instructions.
To verify, download OVMF.amdsev.verda-amdsev-largebars-stable202605.fd from the GitHub release and check its SHA-256 against the table above, or rebuild from the linked commit. A copy is also already on your instance: provisioning bundles the exact measured blob to /boot/OVMF.amdsev.fd
vmlinuz and initrd
vmlinuz is your (compressed) Linux kernel; initrd.img is the initial ramdisk, a minimal early-userspace filesystem the kernel uses to mount the real root filesystem. Unlike the firmware, these are yours: they come out of the instance's own OS volume, not from Verda.
Every time a CVM boots, the provisioner maps the OS volume's image on the hypervisor, scans its partitions (mounted read-only), and copies the canonical vmlinuz / initrd.img files found on the volume into a host-side cache (following the distro's symlinks, so it always extracts whatever kernel your OS currently has installed). QEMU then boots the extracted files directly (-kernel / -initrd) with SEV-SNP kernel hashes, so they are folded into the launch measurement just like the firmware.
Because the measurement is bound to those exact files, a kernel update inside the CVM (e.g. apt full-upgrade) takes effect the next time you Shutdown and Start from the console: the new kernel is extracted and becomes part of the fresh launch measurement automatically. This is also what makes Booting a Custom OS work.
Verify GPU confidential computing mode
$ nvidia-smi conf-compute -q
==============NVSMI CONF-COMPUTE LOG==============

    CC State                   : ON
    Multi-GPU Mode             : None
    CPU CC Capabilities        : AMD SEV-SNP
    GPU CC Capabilities        : CC Capable
    CC GPUs Ready State        : Not Ready
Run NVIDIA GPU attestation
Note
Use of the NVIDIA attestation script requires compliance with NVIDIA's Product-Specific Terms for Confidential Computing.
Install nvattest (one-time):
Run remote attestation against the GPU:
$ nvattest attest --device gpu --verifier remote
Devices:
- Device 0:
    Device Type: gpu
    Hardware Model: GB20X
    UEID: 632831960640621557346471716215948155372539415535
    VBIOS Version: 98.02.8D.00.01
    Driver Version: 580.126.09
    Measurement Result: success
    Attestation Report Cert Chain:
        Status: valid, OCSP: good
        Expires: 9999-12-31T23:59:59Z
    Driver RIM Cert Chain:
        Status: valid, OCSP: good
        Expires: 2028-01-07T22:11:08Z
    VBIOS RIM Cert Chain:
        Status: valid, OCSP: good
        Expires: 2027-08-26T10:19:38Z

GPU attestation was successful
Key fields to check in the output:
| Field | Expected |
|---|---|
| Measurement Result | success |
| Attestation Report Cert Chain | valid, OCSP: good |
| Driver RIM Cert Chain | valid, OCSP: good |
| VBIOS RIM Cert Chain | valid, OCSP: good |
| Final line | GPU attestation was successful |
Set the GPU ready state
The GPU will not accept any workload until a user inside the CVM sets the ReadyState. This prevents accidental usage before attestation is complete.
Successfully passing remote attestation (see above) automatically sets the ready state. You can also set it manually:
Protecting Your Confidential Data
When running a Confidential VM, you can create a user with an encrypted home folder so that your data at rest is also protected.
Create an encrypted user
Log in to your user with login (this will ask for your password and decrypt the home folder):
Verify home folder encryption
Create a test file from your user session:
Then exit and inspect the home folder as root. If encryption is working correctly, you will not see test.txt but instead encrypted directory entries:
$ exit
root@ncc-vm:~# ls -lah /home/newusername/
total 8.0K
dr-x------ 2 newusername newusername   4.0K Mar  2 14:25 .
drwxr-xr-x 4 root        root          4.0K Mar  2 14:44 ..
lrwxrwxrwx 1 newusername newusername   33 Mar  2 14:25 .Private -> /home/.ecryptfs/newusername/.Private
lrwxrwxrwx 1 newusername newusername   34 Mar  2 14:25 .ecryptfs -> /home/.ecryptfs/newusername/.ecryptfs
Booting a Custom OS
By default, Verda CVM instances are provisioned with Ubuntu 24.04. If you need a different or custom OS (e.g. Ubuntu 25.10), you can replace the OS on the primary volume in place. Verda uses direct kernel boot, so there is no GRUB step: the instance is booted once into a RAM-only dropbear SSH initramfs that pauses before mounting /dev/vda, the new image is streamed straight onto /dev/vda, and the instance is then restarted into the new OS.
Warning
Confidential Computing instances cannot reboot from inside the guest. Each step that "restarts" the VM means: in the Verda console, Shutdown then Start (the scripts power the guest off for you and then wait for it to come back).
How it works
dropbear-initramfsis installed on the running instance, plus aninit-premount/99-pausehook that holds the boot in the initramfs forever: DHCP comes up anddropbearlistens on port 22, but/dev/vdais never mounted.- The instance is powered off; you Start it from the Verda console. Verda extracts the kernel/initrd and boots the paused initramfs, where
/dev/vdais free. - The new image is streamed from your local machine straight onto
/dev/vda. - The instance is powered off again; you Start it, and Verda boots the new OS.
Prerequisites
- A Verda CVM instance with SSH access as root.
- On your local machine:
Download the helper scripts and sample env file into a working directory:
1. Configure
$ cp env_sample.txt .env
$ # Edit .env: set REMOTE (root@<instance-ip>); SSH_KEY defaults to your ed25519 key
2. Build the OS image (local machine)
Produces questing-server-raw.img (~3.5 GiB raw, ~650 MB compressed on the wire): Ubuntu 25.10 with your SSH key injected, DHCP networking, cloud-init disabled, and a first-boot growpart+resize2fs that fills the disk.
3. Boot into the rescue initramfs
Installs dropbear-initramfs + the 99-pause hook, rebuilds the initramfs, and powers the instance off. When prompted, go to the Verda console and Start the instance (if it still shows running, Shutdown first, then Start). The script waits until dropbear answers and /dev/vda is unmounted.
4. Flash the new OS
Verifies /dev/vda is unmounted, streams the image onto it, and triggers an in-guest poweroff. When prompted, Start the instance again from the Verda console; the script waits for the new OS to answer SSH and reports success.
Booting an Encrypted Custom OS
Everything in Booting a Custom OS applies here too, with one addition: the OS volume itself is LUKS2-encrypted, and it only unlocks after the instance proves, via the same SEV-SNP attestation chain described above, that it is genuine, unmodified hardware running exactly the boot chain you built. This pairs data-at-rest protection with the data-in-use protection CC already gives you, closing the gap between the two.
Warning
Confidential Computing instances cannot reboot from inside the guest. Each step that "restarts" the VM means: in the Verda console, Shutdown then Start. Additionally, after every future restart of this instance, not just the first one, you must run the attest-and-unlock step below again before the OS will boot.
How it works
- Same rescue/flash mechanism as Booting a Custom OS, but the image built here has an encrypted root: everything except
/bootand the EFI partition lives inside a LUKS2 container. - After flashing, every boot lands in a purpose-built initramfs that generates a fresh, one-time SSH key in RAM, produces a SEV-SNP report bound to that key, and waits: the disk stays locked until this step passes.
- A script on your local machine fetches that report, verifies AMD's signature chain, recomputes the expected launch measurement, and confirms the report is bound to the key it's talking to. Only if all of that checks out does it send the disk passphrase.
- Because nothing about an unlock is remembered across a power cycle, this repeats on every boot: each restart re-proves the machine is genuine before the OS can start, not just the first time.
| File | What it does |
|---|---|
encrypted_00_build_image.sh |
Local, run as root. Downloads and customizes an Ubuntu 26.04 image, then builds the encrypted disk: an unencrypted /boot (kernel + a special unlock initramfs) and a LUKS2-encrypted root. Also sets up a first-boot step that grows the encrypted root to fill the disk. |
encrypted_attested_initramfs.sh |
Called by the build script (you don't run it yourself). Installs the attestation + unlock logic into the initramfs: the fresh per-boot SSH key, the SEV-SNP report server, and the logic that swaps in the decrypted root once unlocked. |
encrypted_01_setup_initramfs_ssh.sh |
Local. Same rescue-mode step as Booting a Custom OS: pauses the instance in a RAM-only initramfs so its disk can be safely overwritten. |
encrypted_02_flash.sh |
Local. Streams the encrypted image onto the instance's disk, then powers it off. |
encrypted_03_attest_and_unlock.sh |
Local. Run after every boot: verifies the AMD signature and the launch measurement, confirms the report is bound to the SSH key it's talking to, and only then sends the disk passphrase so the encrypted OS can boot. |
Prerequisites
- A Verda CVM instance with SSH access as root.
- On your local machine:
Download the helper scripts and sample env file into a working directory:
- encrypted_env_sample.txt
- encrypted_00_build_image.sh
- encrypted_attested_initramfs.sh
- encrypted_01_setup_initramfs_ssh.sh
- encrypted_02_flash.sh
- encrypted_03_attest_and_unlock.sh
1. Configure
$ cp encrypted_env_sample.txt .env
$ # Edit .env: set REMOTE (root@<instance-ip>); SSH_KEY defaults to your ed25519 key; set LUKS_PASS
2. Build the encrypted OS image
This builds Ubuntu 26.04 specifically. The tool relies on Debian/Ubuntu's own package manager and initramfs mechanism (apt, initramfs-tools), so it doesn't generalize to other distro families (Fedora, RHEL, and similar).
Adding your own customization: the script installs the base image via a single virt-customize call. Add more flags to that same call to bake in anything else you need.
It also produces the encrypted raw image plus a verify/ folder (kernel, initrd, cmdline) used by the attestation step later. The second command copies the instance's current firmware so the expected measurement can be computed; do this before flashing overwrites the instance.
3. Boot into the rescue initramfs
Same as Booting a Custom OS: installs the pause hook, rebuilds the initramfs, and powers the instance off. Start it from the Verda console when prompted.
4. Flash the new OS
Streams the encrypted image onto the disk and powers the instance off again. Start it from the Verda console; it boots into the attested unlock initramfs and waits.
5. Attest and unlock
Verifies the AMD signature chain, checks the launch measurement against what you built, confirms the SEV-SNP report is bound to the SSH key it's talking to, and, only if everything checks out, sends the disk passphrase. The instance then boots into your encrypted OS. Run this same command again after every future restart to unlock it.
6. Confirm the encryption
$ cryptsetup status cryptroot

/dev/mapper/cryptroot is active.
  type:    LUKS2
  cipher:  aes-xts-plain64
  keysize: 512 bits
  key location: keyring
  device:  /dev/vda4
type: LUKS2 and a real cipher/keysize confirm / is genuinely backed by an encrypted LUKS volume, not a plain partition. If you ever see is inactive here, the unlock in step 5 didn't actually succeed.