# Quick: Deploying GPT-OSS 120B (Ollama) on Serverless Containers
### Overview
This tutorial provides step-by-step instructions for deploying [OpenAI's GPT-OSS 120B](https://openai.com/index/introducing-gpt-oss/), as a scalable API endpoint using the Verda Serverless Container platform.
This process uses a pre-built Docker image running the [Ollama](https://ollama.com/) server.The container will download the model weights on its first run and reuse them across restarts, ensuring fast subsequent startups.
### Pre-requisites
* A Verda Cloud Platform account to deploy serverless containers.
* A Docker image hosted in a container registry. If you need to create one, follow our guide on [How to Publish Your First Docker Image.](https://docs.datacrunch.io/containers/tutorials/tutorial-how-to-publish-your-first-docker-image-to-docker-hub)
### Preparing a Custom Container Image (Optional)
For advanced control, you can build and publish your own image. This allows you to specify the exact Ollama version and add other tools.
{% hint style="success" %}
**Note:** The `FROM` instruction below uses a specific Ollama version (e.g., `ollama/ollama:0.12.6`). We recommend checking the [Ollama Docker Hub page](https://hub.docker.com/r/ollama/ollama/tags) for the latest version and updating it as needed.
{% endhint %}
Create a `Dockerfile` with the following content. The `jq` utility is not needed in the image itself; it is a client-side tool for formatting the API response.
```dockerfile
FROM ollama/ollama:0.12.6
# Install curl for health checks
RUN apt-get update && \
apt-get install -y curl && \
rm -rf /var/lib/apt/lists/*
# Create a robust startup script inside the image
RUN cat > /start-ollama.sh <<'EOF'
#!/bin/bash
set -e
echo "=== Ollama Container Starting ==="
echo "Model storage path: ${OLLAMA_MODELS:-/data/.ollama/models}"
echo "Host binding: ${OLLAMA_HOST:-0.0.0.0:8000}"
# Set default values for model storage and host
export OLLAMA_MODELS=${OLLAMA_MODELS:-/data/.ollama/models}
export OLLAMA_HOST=${OLLAMA_HOST:-0.0.0.0:8000}
echo "Creating models directory: ${OLLAMA_MODELS}"
mkdir -p "${OLLAMA_MODELS}"
# Start Ollama server in the background
OLLAMA_PORT=${OLLAMA_HOST##*:}
echo "Starting Ollama server on port ${OLLAMA_PORT}..."
ollama serve &
OLLAMA_PID=$!
# Wait for the Ollama API to become available
echo "Waiting for Ollama API to be ready..."
TIMEOUT=600
ELAPSED=0
while ! curl -s http://localhost:${OLLAMA_PORT}/api/tags >/dev/null 2>&1; do
if [ $ELAPSED -ge $TIMEOUT ]; then
echo "ERROR: Ollama failed to start within $TIMEOUT seconds"
kill $OLLAMA_PID 2>/dev/null
exit 1
fi
sleep 1
ELAPSED=$((ELAPSED + 1))
done
echo "✓ Ollama API is ready!"
# If a model is specified in the environment variable, download it
if [ -n "$OLLAMA_PULL_MODEL" ]; then
echo "Model requested: $OLLAMA_PULL_MODEL"
if ollama list | grep -q "^${OLLAMA_PULL_MODEL}"; then
echo "✓ Model $OLLAMA_PULL_MODEL already exists."
else
echo "→ Downloading model: $OLLAMA_PULL_MODEL. This may take a while..."
if ollama pull "$OLLAMA_PULL_MODEL"; then
echo "✓ Model download successful!"
else
echo "ERROR: Failed to download model."
fi
fi
fi
# Trap signals for graceful shutdown
trap "echo 'Shutting down...'; kill $OLLAMA_PID; exit 0" SIGTERM SIGINT
echo "=== Ollama server is running on ${OLLAMA_HOST} ==="
wait $OLLAMA_PID
EOF
# Make the startup script executable
RUN chmod +x /start-ollama.sh
# Set default environment variables. These can be overridden at runtime.
ENV OLLAMA_MODELS=/data/.ollama/models
ENV OLLAMA_HOST=0.0.0.0:8000
ENV OLLAMA_PULL_MODEL=llama3:8b
# Add a healthcheck to let Docker know when the container is ready
HEALTHCHECK --interval=30s --timeout=10s --start-period=60s --retries=3 \
CMD curl -f http://localhost:8000/api/tags || exit 1
LABEL maintainer="support@datacrunch.io" \
version="1.0" \
description="Ollama with automatic model download support"
# Expose the default port
EXPOSE 8000
# Set the entrypoint to our startup script
ENTRYPOINT ["/start-ollama.sh"]
```
you can follow the complete tutorial on publishing to docker registry [here](https://docs.datacrunch.io/containers/tutorials/tutorial-how-to-publish-your-first-docker-image-to-docker-hub)
### Deployment Steps
Follow these instructions carefully in the Verda cloud console to create your deployment.
#### 1. Navigate to New Deployment
Log in to the [Verda cloud console](https://console.verda.com/signin) and from the side bar navigate to **Serverless Containers -> New deployment**.
#### 2. Basic Configuration
* **Deployment Name:** Choose a unique name for your deployment to avoid conflicts (e.g., `gpt-oss-your-initials`).
* **Compute Type:** Select a GPU with sufficient VRAM. The GPT-OSS 120B model is very large; we recommend selecting a compute type with at least **80 GB of VRAM** (e.g., NVIDIA H100 or A100 80GB) to prevent deployment failures.
#### 3. Container Image Configuration
This is a critical step. You must provide the full, versioned path to the container image.
* **Container Image:** the format will be `docker.io//:`
* **Example:** `docker.io/datacrunch/gptoss:v1.0`
* **Action:** Replace `datacrunch` with you're actual Docker Hub username, `gptoss` with the actual name of your image and `v1.0` with the specific version tag of the image you want to deploy.
{% hint style="danger" %}
**Warning:** The platform does not allow the use of the `:latest` tag. This is a best practice to ensure your deployments are predictable. Always use a specific, immutable version tag (e.g., `:v1.0`).
{% endhint %}
#### 4. Networking and Ports
* **For Public Images:** Leave the **Registry Credentials** set to `None`.
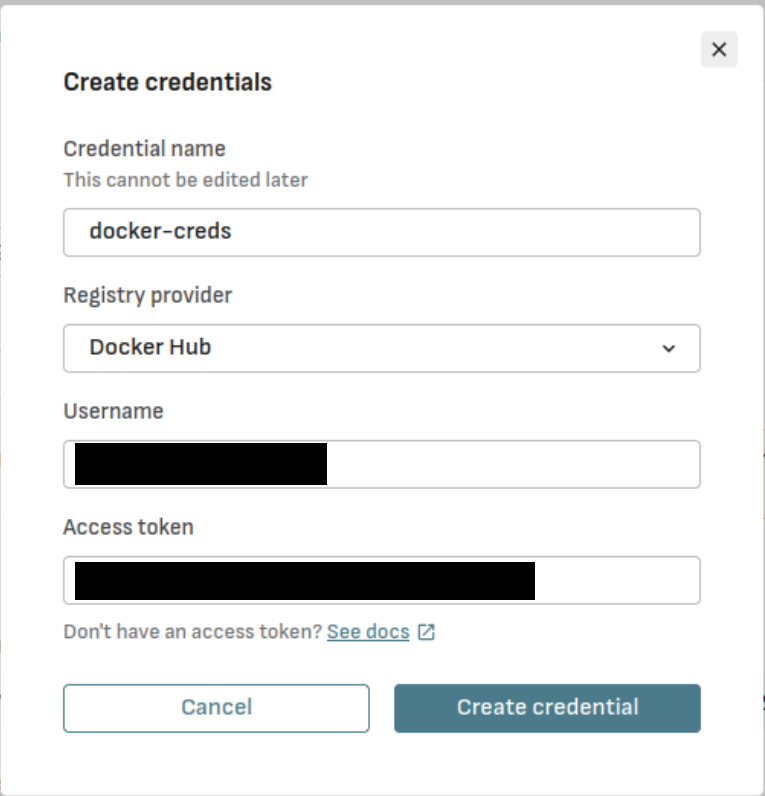
* **For Private Images:** You must provide credentials.
1. Click **Create Credentials**.
2. Give the credentials a name (e.g., `docker-hub-creds`). In this tutorial, we will be using Docker Hub's registry.
3. Enter your Docker Hub **Username** and paste in your **Access Token** as the password.
4. Click **Create Credential**.
* **Exposed HTTP Port:** Set this to `8000`, the default port for the Ollama server.
* **Delete** any Environment Variables as we don't need them for this tutorial
#### 5. Health Check Configuration
The health check is crucial for the platform to know when your container is ready to receive traffic. An incorrect health check is the most common reason for deployment failure.
* **Healthcheck Port:** Will be automatically set to the exposed HTTP port unless you change it
* **Healthcheck Path:** Set this to a lightweight API endpoint that indicates the server is running. For Ollama, the `/api/tags` endpoint is perfect for this.
* **Action:** Set to `/api/tags`.
#### 6. Storage and Scaling
Verda automatically attaches a persistent storage volume at the `/data` path inside the container. We will configure Ollama to use this volume to store model weights, so they are not re-downloaded on every container restart. You can leave the Scaling options to their default values.
#### 7. Deploy
Review your settings and click **Deploy Container**. That's it! You have now created a deployment. You can check the logs of the deployment from the logs tab.
***
### First-Time Startup
The first time the container starts, it will take some time and be slow. You can view the logs to see the progress of the `ollama pull` command as it downloads the 120B model to the `/data` volume. At this point, in the console it will show the container is unavailable, no need to worry. This is a one-time operation. Subsequent restarts will be much faster.
### Connecting to the Endpoint
Before you can connect to the endpoint, you will need to generate an authentication token, by going to `Credentials -> Inference API Keys`, and click Create.
{% hint style="warning" %}
**NOTE:** Make sure to immediately copy and save the inference token somewhere safe as it will not be visible after closing the dialog box
{% endhint %}
The base endpoint URL for your deployment is in the `API` section towards the top left of the screen.
Once the container is marked as "Healthy" and the status of the container changes to "running" on the console, you can test it using `curl`.
{% hint style="info" %}
**Notice the added sub path** : `/v1/chat/completions` to the base endpoint URL
{% endhint %}
{% hint style="warning" %}
**Note:** In the command below, you must replace `` and `` with your actual deployment URL and API key.
{% endhint %}
```bash
curl -X POST https:///v1/chat/completions \
-H 'Authorization: Bearer ' \
-H 'Content-Type: application/json' \
-d '{
"model": "gpt-oss:120b",
"messages": [
{ "role": "system", "content": "You are a helpful writer assistant." },
{ "role": "user", "content": "Briefly describe what is deep learning?" }
],
"stream": false
}'
```
to improve the readability of the JSON output, you can install a command-line tool like [jq](https://jqlang.org/) on your local machine and pipe the curl command to it:
```bash
# Example with jq for pretty-printing
curl -X POST https:///v1/chat/completions \
-H 'Authorization: Bearer ' \
-H 'Content-Type: application/json' \
-d '{
"model": "gpt-oss:120b",
"messages": [
{ "role": "system", "content": "You are a helpful writer assistant." },
{ "role": "user", "content": "Briefly describe what is deep learning?" }
],
"stream": false
}' | jq
```
**Congratulations!** You have now deployed OpenAI's gpt-oss on serverless inference.